It’s not long now before the bunny arrives, so I thought it would be a good time to share an Easter project with you.
But first, I need to clarify one thing… I know that bunnies do not hatch from eggs.
When I created this project I was under a little bit of pressure.
I was asked by a magazine if I could design a project for their Easter issue…
” Of course I can” I said.
But…there was only one catch; the deadline for the issue was a week away!
Now, normally this wouldn’t bother me but I needed to physically have the project, instructions, line drawing etc. delivered to them by the due date. You see, the publisher is situated in another state and it takes four working days to have anything delivered there. So that one week deadline became a three day deadline.
I had to start at the drawing board to the end process of pattern writing. While hoping there were no mishaps along the way.
And the whole time…I had two humiliated teenagers shouting at me “bunnies do not hatch from eggs!”
So, my excuse for this is;
“Artistic Licence”… the freedom to create an artwork by distorting the facts so I can express myself creatively… and… to get to the finish line on time.
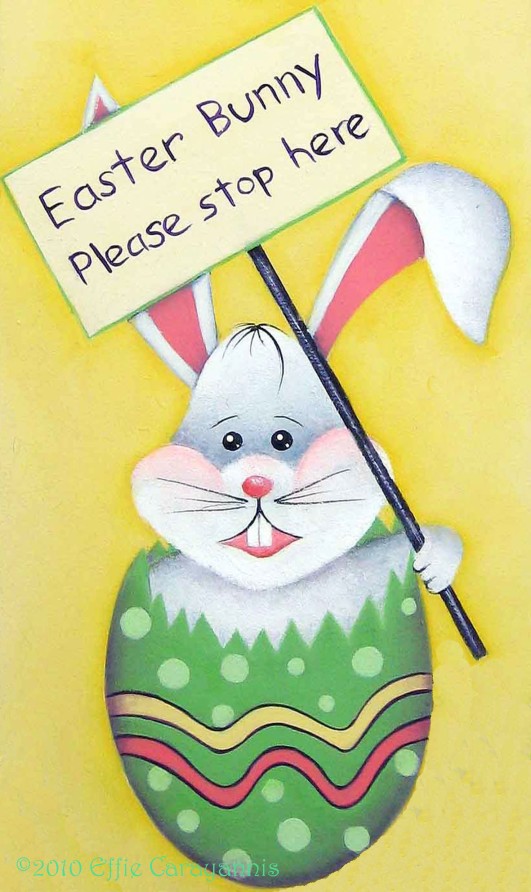
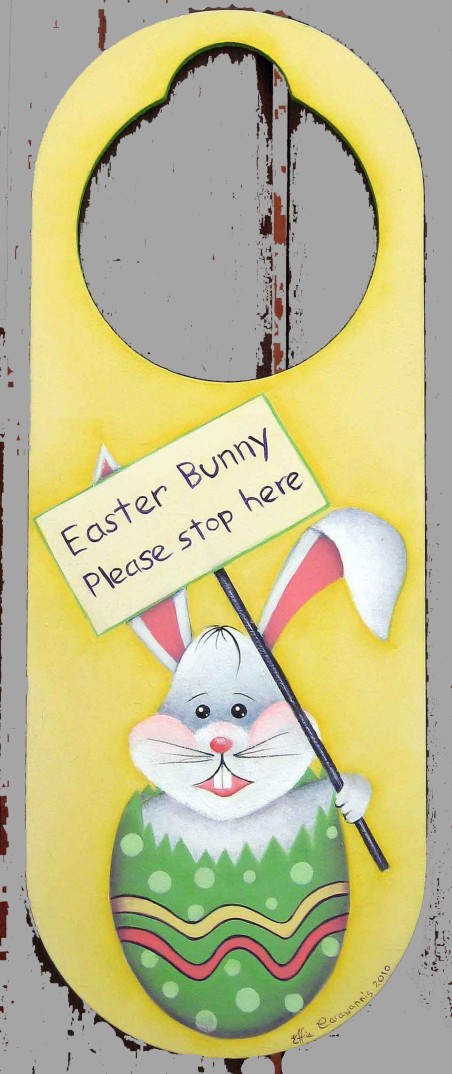
Here is my “Easter Bunny” for you to create and enjoy,
_________________________________________________________________
“Easter Bunny, Please Stop Here” – project instructions
Material
MDF door hanger 90mm x 240mm
Tracing paper
Transfer paper
Stylus
Fine grade sandpaper
Basecoating brush
No. 2 filbert brush
¼ inch angle shader
½ inch angle shader
¼ inch deerfoot brush
No.10/0 liner brush
No.2 round brush
¼ inch flat brush
Paper towel
Jo Sonja’s All Purpose Sealer
Jo Sonja’s Potting Shed Collection; Seedling
Jo Sonja’s Artist Colours; Warm White, Naples Yellow Hue, Paynes Grey, Titanium White, Rose Pink, Carbon Black, Diox Purple, Turners Yellow
Jo Sonja’s Polyurethane Water Based Varnish: Satin
Preparation and background
Apply a coat of All Purpose Sealer with the basecoating brush, allow it to dry and give it a light sand. Re-apply the Sealer before sanding again and leaving it to dry thoroughly. Then apply three coats of Warm White/ Naples Yellow Hue 1:1
with the basecoating brush allowing each coat to dry and sanding between them.
Transferring the design
Transfer the design onto tracing paper and transfer the main outlines using the transfer paper and stylus.
Painting the design
Bunny
Block-in with two coats of Warm White/Paynes Grey 4:1 with the filbert brush.
Transfer the remaining details from the tracing paper using the transfer paper and stylus. Side load the ¼ inch angle shader with Warm White/ Paynes Grey 2:1 and float the shading. With the deer foot brush stipple over the shading with the same colour mix bringing it out a little further. Wipe the brush clean on a paper towel and stipple Warm White in the highlight areas, blending the colours together as you move towards the blue shading so a smooth transition of colour is achieved. Then stipple Titanium White on the tip of each highlight. Block-in the nose, mouth and the inner part of the ears with two coats of Warm White/Rose Pink 2:1 using the liner brush, then, dry brush a little Warm White in the centre of the nose with the same brush. Paint the teeth with three coats of Warm White using the liner brush. Side load the ¼ inch angle shader with the pink mix and float along the top of the cheeks. Mix enough water with Carbon Black to achieve an ink like consistency and paint the nose, hair, whiskers, eyebrows and the tip of each paw using the liner brush. Side load the ¼ inch angle shader with watery Paynes Grey and float behind the head where the ears sit and where the ear folds over.
Use the end of the brush and Carbon Black to place the dots for the eyes. Let them dry thoroughly, then, with the end of the stylus and Warm White place a dot on the top left hand side of each eye followed by a smaller dot on the bottom right hand side using the tip of the liner brush with the same colour.
Egg
Block-in with three coats of Seedling using the filbert brush, the jaggered edge is painted with the liner brush. Transfer the remaining details from the tracing paper using the transfer paper and stylus. Paint the pink wavy line with Warm White/Rose Pink 2:1 with the round brush and the yellow wavy line with Naples Yellow Hue, then, outline both with Diox Purple using the liner brush. The light green spots are painted with three coats of Warm White/Seedling 2:1. Side load the ¼ inch angle shader with Seedling/Diox Purple 1:tch and float around the inside edge of the egg.
Sign
Block-in with three coats of Warm White/ Naples Yellow Hue 3:1 using the flat brush then outline it with Seedling using the liner brush. Transfer the writing from the tracing paper using the transfer paper and stylus and paint it with Diox Purple. Paint the post with the same colour then highlight down the centre with Warm White/ Diox Purple 3:1. Re apply the highlight with a little Warm White.
Finishing
Side load the ½ inch angle shader with Turners Yellow and float around the design. Erase any visible transfer lines and give the piece several coats of varnish with the basecoating brush.
 __
__
Happy Painting,
Effie

Fun project….. your bunny in an egg makes perfect sense!
LikeLiked by 1 person
Thank You for understanding me Amy 🙂
LikeLike